Showing posts with label blogger. Show all posts

Friday, April 18, 2014

When’s the Best Day and Time to Post on Social Media?

It’s the age-old social media and content marketing question: when’s the best time to post on social media?

best-time-to-post-on-social-media-addthis


Your social analytics can give you an indication of when your audience is engaging with your content, and there are tons of blog posts out there offering you sound advice on when you should post your content on social media. But it’s not enough to just know when your visitors are online, but when they’re engaging online (i.e. clicking, sharing, emailing, and even printing).

We took a look at our proprietary data based on 14 million sites using our tools worldwide (that’s about 3 billion pageviews a day), to help you optimize when you should post your content, including the day, time, and social network. Here’s what we found for Facebook, Twitter, LinkedIn, and Pinterest.

Facebook, Twitter in the daytime. Pinterest in the evening.

First, we looked at clicks and shares to see when users are consistently engaging with content the most during an average week. Keep in mind that all times are Eastern Time.

Facebook Twitter LinkedIn Pinterest
Shares       9am-11am,12pm    10am-12pm   10am, 2pm   3pm, 8pm
Clicks          3pm-5pm     3pm-5pm    1pm-2pm   8pm-10pm

Most sharing to Facebook, Twitter, and LinkedIn happens in the morning, when people get to work. Consequently, clicking (which is different from sharing) tends to dominate Facebook, Twitter, and LinkedIn in the afternoon hours. Pinterest users have the most activity in the evening hours when readers both share and click content as they’re winding down after work.

Tip: So, if you’re looking to increase clicks on your company’s social channels, try posting your content in the afternoons. instead of the mornings

Aim for the peaks every week.

We also looked at the peak of the week to see what day and time had content engagement spikes in an average week.
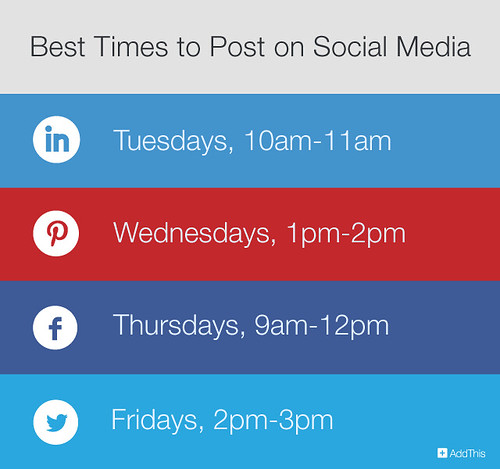
Facebook    Twitter    LinkedIn    Pinterest
Clicks & Shares Thursdays,
9am-12pm
    Fridays,
   2pm-3pm
    Tuesdays,
   10am-11am
      Wednesdays,
        1pm-2pm

It’s interesting to see that each social network has a different peak day and time; not everyone engages with all social networks at the same time. Common sense if you think about it.

Tip: If you’re posing your content across social networks, maximize engagement by posting on the peak day and time of those networks.

As much as data can be useful, don’t forget to think about the human aspect of sharing. Think about your own behaviors and habits on social networks. When are you most likely to share content and using what social media network? When do you have breaks at work? What social network do you find yourself scrolling through when watching TV at night? Chances are, your audience’s behaviors may not be that far off from yours.
Read More

Saturday, March 29, 2014

30+ (More) Most Wanted WordPress Tips, Tricks And Hacks

Most of the WordPress blogs look more or less similar these days, to stand uniquely out from the rest, you have got to tweak it. And by tweaking, we mean really getting your hands dirty down on the blog theme and PHP codes. We’ve previously showcased more than 40 WordPress tricks and hacks you can perform on your blog but we quickly realized there are still a lot of impressive WordPress tricks, hacks and plugins out there that we thought are really great.

Wordpress Tricks Hacks

So as a sequel, here’s another 30+ WordPress tricks and hack. If you are wondering how some bloggers add those cool functions, mods or displays on their WordPress blog, be sure to run through our list. You might just find the solution in here.

Apple Flashy Accordion Sidebar

Use the Accordion plugin in jQuery UI to create an Apple-alike WordPress sidebar.

Adding Tabs to Sidebar

Creating tabs on WordPress sidebar with Yahoo! UI Library

Sidebar With Dynamic Contents

Every blog visitor has different habits, but many tend to ignore sidebars because they are always the same. Mixing things up and keeping the contents of the sidebar relevant to the post can make them a bit more likely to be noticed.

Allow Users To Submit Blog Post

This plugin allows you to add highly customisable forms to your website that allows non-registered users and/or subscribers (also configurable) to submit posts.

Paginated Comments

Give you the ability to break your comments into a number of search engine optimized pages.

Image Caption

Extracts the title or alt attribute from images within your blog post and generates a neat caption directly underneath those images. Supports custom CSS styling for captions.


Random Redirect

Allows you to create a link to yourblog.example.com/?random which will redirect someone to a random post on your blog, in a StumbleUpon-like fashion.

Google Syntax Highlighter for WordPress

Easily integrates the Google Syntax Highlighter by Alex Gorbatchev into WordPress. Image below show how codes look like in WordPress with Google Syntax Highlighter.


Facelift Image Replacement (FLIR) for WordPress

FLIR allows you to convert text and title into images (better display quality) on the fly without hassle. Now this FLIR WordPress plugin make things even easier for bloggers.

del.icio.us for WordPress

del.icio.us for WordPress displays your latest del.icio.us bookmarks in your WordPress blog.

Create Your Own PopURLs Within WordPress

Like the way how PopURL display contents? Now you can create similar inside WordPress.

Exclude certain categories from being displayed

2 ways to hide posts from certain categories to be displayed on the blog. You can either put this code inside the loop

<?php 
if ( have_posts() ) : query_posts($query_string .'&cat=-1,-2'); while ( have_posts() ) : the_post();
?>
    
or you can use Advanced Category Excluder.

Another Date Image Hack 

Create a calendar view of your article post date.

Styling Individual Posts

Styling one post a little different from the rest with the use of the_ID.

How To Avoid Duplicate Posts

Duplicated contents are pretty bad and they somehow affects how search engine weights your site. Here’s how you can avoid getting duplicated contents on your blog.

WordPress ‘Page Redirect‘ template

This template lets you specify a single URL as the page content, then as the page loads, the template automatically redirects the page to this new location, and that includes category or any tag pages you specify.

Delicious Save Buttons

Add badges that encourage people to bookmark your website or blog

DesignFloat Buttons, Website & Blog Integration

Give your website or blog visitors the option to submit your stories to Design Float and "Float" them

<script type="text/javascript">submit_url = 'Your URL Here';</script>
<script type="text/javascript" src="http://www.designfloat.com/evb/button.php"></script>     
    

<script type="text/javascript">submit_url = 'Your URL Here';</script>
<script type="text/javascript" src="http://www.designfloat.com/evb2/button.php"></script> 
    
Read here for more.

StumbleUpon Buttons & Tools

Add a Stumble It! button to your site to make it easy for your visitors to submit your content to StumbleUpon.


Dynamic Highlight Menu

This allows you to theme/style and control the currently selected menu tab in CSS by adding a class="current" on it.

<ul id="nav">
  <li<?php if ( is_home() || is_category() || is_archive() || is_search() || is_single() || is_date() ) { echo ' class="current"'; } ?>><a href="#">Gallery</a></li>
  <li<?php if ( is_page('about') ) { echo ' class="current"'; } ?>><a href="#">About</a></li>
  <li<?php if ( is_page('submit') ) { echo ' class="current"'; } ?>><a href="#">Submit</a></li>
</ul>    

If Home, or Category, or Archive, or Search or Single page is selected, class="current" will be included in <li>

Line 3,4:

If Page with page slug about or submit is highlighted, class="current" is added.
If you are looking at putting categories as menu tabs, here’s how to make the menu dynamic:
<ul id="nav">
  <li<?php if ( is_category('css') ) { echo ' class="current"'; } ?>><a href="#">CSS</a></li>
  <li<?php if ( is_category(showcase) ) { echo ' class="current"'; } ?>><a href="#">Showcase</a></li>
</ul>
Line 2,3

If category with category slug of css or showcase, class="current" is added.

DZone Buttons

Let your website’s users vote for our links on DZone without leaving your site.

<script type="text/javascript">var dzone_url = '[url]';</script>
<script type="text/javascript">var dzone_title = '[title]';</script>
<script type="text/javascript">var dzone_blurb = '[description]';</script>
<script type="text/javascript">var dzone_style = '1';</script>
<script language="javascript" src="http://widgets.dzone.com/widgets/zoneit.js"></script> 
    

<script type="text/javascript">var dzone_url = '[url]';</script>
<script type="text/javascript">var dzone_title = '[title]';</script>
<script type="text/javascript">var dzone_blurb = '[description]';</script>
<script type="text/javascript">var dzone_style = '2';</script>
<script language="javascript" src="http://widgets.dzone.com/widgets/zoneit.js"></script> 
    
More on DZone Buttons, Tools and Widgets

Reddit Buttons

Similar to the rest, place a reddit button on your site to promote blog post.

<script type='text/javascript'>reddit_url='[URL]'</script>
<script type='text/javascript'>reddit_title='[TITLE]'</script>
<script type="text/javascript" src="http://www.reddit.com/button.js?t=1"></script>

<script type='text/javascript'>reddit_url='[URL]'</script>
<script type='text/javascript'>reddit_title='[TITLE]'</script>
<script type="text/javascript" src="http://www.reddit.com/button.js?t=2"></script>

<script type='text/javascript'>reddit_url='[URL]'</script>
<script type='text/javascript'>reddit_title='[TITLE]'</script>
<script type="text/javascript" src="http://www.reddit.com/button.js?t=3"></script>
Source.

Archive that works

Noura of Noupe.com shows various ways you can style your WordPress Archive page. Techniques and guides includes:
  • Listing all Posts
  • Display monthly or Yearly Archive
  • Archives Ordered By Category
Read this entry.

Add Breadcrumbs to Your WordPress Blog

Breadcrumb trails are a good supplementary navigation system that aid in site usability. This plugin allows you to add breadcrumbs to your theme.

Landing Sites / Pages

p>When visitors is referred to your site from a search engine, they are definitely looking for something specific – often they just roughly check the page they land on and then closes the window if what they are looking for isn’t there. Why not help them by showing them related posts to their search on your blog?


This WordPress plugin searches the files on your site for a few known strings sometimes used by hackers, and lists them with code fragments taken from the files. It also makes a few checks of the database, looking at the active_plugins blog option, the comments table, and the posts table.

Buy Me a Beer


Allows your readers to donate money to you via PayPal. Not something new, but worth knowing.

Display Feedburner Subscriber Count In Text

How to display feedburner subscriber count in text instead of using chiklets.

Notifixious – Notify Users via IM

This plugin allows you to notify your readers on their Instant Messaging (AIM, MSN, GTalk, ICQ…), Email or SMS when you publish new posts.

Installing Xampp and WordPress

Guide to setup Xampp and run WordPress locally on your machine. You can also install plugins, upgrade to the latest nightly and virtually anything else confident in the knowledge that if it goes wrong, there is no impact on your actual site.

Create an Ajax-based Auto-completing Search Field

Why not helping your visitors to find what they’re looking for on your blog, by using a cool auto-completion on your search field?

Read More

Sunday, March 9, 2014

Get To Know 5 Richest Bloggers Of The World


You know that you read them before you invest your money, before you buy a new phone and also when you have got nothing better to do.

But what you may not know is that there are millions like you and together, you have indirectly and unknowingly contributed - so that a few good people become millionaires.Blogging has been the 'in thing' for quite some time now, and it has slowly and steadily made its way to being the most lucrative and well-paying career choice.

Below is the list of 5 richest bloggers of the world.

1. Pete Cashmore
Starting Mashable from his humble abode in Scotland when he was just 19, Cashmore has come a long way in terms of success and reach. The most followed Twitter handle, @Mashable, has 3.7 million followers while Cashmore makes around $600,000 per month. Truly, it's 'cash more' all the way.

2. Michael Arrington
Known to the world as the ultimate tech guru, Michael Arrington is the man you want to be, if you dream of making it big in tech blogging. His blog techcrunch.com is the most dominant technology blog, earning Arrington a whopping $500,000 a month.


3. Mario Armando Lavandeira, Jr.
Known to the world as Perez Hilton, Mario Armando Lavandeira Jr. provides you every gossip you want to know about your favourite stars and even those that you don't want to know. Believe it or not, he manages to make $200,000-400,000 per month doing just that.

4. Collis Taeed
Collis Taeed writes and makes video tutorials, detailing the tips and tricks of various application software programs and designing tools. His video tutorials are easy to understand and all major photo and video software can be mastered using them. He blogs at TutsPlus.coim and makes around $120,000 per month.

5. Gina Trapani
The only woman to make her way into this list is Gina Trapani who talks about life hacks and daily life tips & tricks at lifehacker.com. It was started in 2005 and you could be wondering how many life hacks she has thought of till now, earning her $110,000 every month.

Read More

Friday, February 7, 2014

Add 40+ New Layout Features To WordPress with Shortcodes Ultimate

Add pull-quotes, spoiler warnings, column layouts and much more to WordPress. Shortcodes Ultimate makes it easy.

WordPress-powered blogs can be enhanced by all manner of plugins, many of which introduce new features. Installing and updating additional features can be time-consuming, however – which is where a plugin like Shortcodes Ultimate comes in.

What Are Shortcodes & What Makes Them Ultimate?

Shortcodes are small snippets of text that you can introduce into a blog post, page or PHP file to add new features. These features will be coded into a separate file that you don’t need to access – all you need to do is use the format [shortcode] to add the visual enhancement, embedded media or layout change to your blog.

Shortcodes Ultimate is particularly good. It offers over 40 useful shortcodes – many with conditions that can be used to tailor their use – that cover everything from adding spoiler tags and other accordion-like hidden areas to animations, buttons, icons and even formatting your pages and posts into columns.
Wielding the power of CSS3, Shortcodes Ultimate also provides you with a useful button for adding shortcodes in the post/page editing screen. Available free, the plugin offers a premium upgrade for $25 which offers an additional 15 shortcodes (including a content slider and a splash screen), 60 new skins and a shortcode creator. These can also be purchased separately as Add-ons.

muo shortcodes ultimate examples   Add 40+ New Layout Features To WordPress with Shortcodes Ultimate

To see a full list of options available with this powerful plugin, use the Shortcodes > Examples page.

How To Install Shortcodes Ultimate

As with any WordPress plugin, Shortcodes Ultimate can be easily installed via Plugins > Add new. Search for the plugin, and follow the instructions to install it. You can also download Shortcodes Ultimate free from the WordPress Plugin Directory and install it through your FTP application.
We recommend that, if you are installing plugins, you first make a backup of your WordPress site’s theme and database. You might do this through your web host’s CPanel or similar software, or by employing a plugin such as Updraft.=

Adding A Shortcode: Pullquotes, Columns And Embeds

With over 40 shortcodes offered by the plugin, you might find yourself overwhelmed by options. The versatility of the plugin can radically enhance your blog, however. The following examples should help illustrate.

muo shortcodes ultimate pullquote   Add 40+ New Layout Features To WordPress with Shortcodes Ultimate
  1. Pullquotes: If you want to enhance the layout of your blog by focussing on the content, you might choose to use blocks of text that are left or right aligned to draw attention to particular sections of the post. These are pullquotes and can be invoked with Shortcodes Ultimate using the [pullquote align="left|right"][/pullquote] tags.
  2. Columns: You can introduce a variety of column-based layouts to your WordPress posts and pages with Shortcodes Ultimate. For instance, you can use [column size="1/2"]Content Column 1[/column] [column size="1/2"]Content Column 2[/column] to create a page with two equal-width columns. There are many varieties, such as a page split into three equal-width columns, or one with a half-page column and two quarter-page columns. You can even combine column layouts by wrapping the [column][/column] shortcodes with [row] and [/row] (There are many ways in which shortcodes can be combined, creating stunning effects).
  3. Third party and self-hosted content can also be added with a shortcode. While you probably won’t bother with YouTube (pasting a URL into a blog post is simpler than [youtube url="http://youtube.com/watch?v=CODESTRING"], after all) self-hosted clips can be added with . Advanced options can be introduced for YouTube, such as the removal of the player controls, and autoplay.
If you need to adjust the CSS for a pullquote, quote or shortcode, use the Shortcodes > Custom CSS tab to add your own code. Stuck with or intimidated by CSS? We have several guides on MakeUseOf dealing with this subject, and a good place to start is James’ 5 Baby Steps To Learning CSS.

Potential Problems: Updates & Conflicts

Having used Shortcodes Ultimate for several months, I’ve become aware of a couple of issues that might cause problems. Although relatively easy to fix, these are things that might cause you to choose a different shortcodes solution. Given the raft of features in Shortcodes Ultimate, it would be a shame if you let these problems affect you. So don’t!

muo shortcodes ultimate settings   Add 40+ New Layout Features To WordPress with Shortcodes Ultimate

First of all, and most common, is the loss of shortcodes when you update the plugin. Recently, the developers of Shortcodes Ultimate have introduced an update that changes the shortcode format from [shortcode] to [su_shortcode], and there is every chance that they might do this again in future.
Fortunately, you can change the format of your shortcode by opening Shortcodes > Settings in the WordPress admin page, and change or clear the entry in the Shortcodes prefix field.

You may also find that Shortcodes Ultimate prevents your blog from opening after install. If this happens, it will probably because your current theme is already hardcoded to run a shortcode that conflicts with those on offer in Shortcodes Ultimate. You can troubleshoot this by switching to the WordPress default theme – checking with the developer of the theme should offer a long term solution.

Conclusion

I discovered Shortcodes Ultimate while looking for a good option to cover up spoilers on my TV themed website. The wealth of options on offer at first seemed like overkill, but over time I’ve used more and more of the layout enhancement offered by Shortcodes Ultimate, and would certainly recommend it to any WordPress blog owner.

Easy to install and simple to use, Shortcodes Ultimate is among the upper echelon of WordPress plugins. Quite simply, everyone should have a copy, which is why we include it the MakeUseOf Best of WordPress Plugins list.
Read More

Sunday, February 2, 2014

How to make a circular image with CSS only

Ever wondered how to make those fancy circular images without the need to edit them in Photoshop? If you don't know what I'm talking about, see Scenewave. This is actually fairly simple. For the sake of this example, let's use my profile image from here.

Basic code


Let's start with basic HTML and CSS for this (I'm assuming you can set up a blank HTML document and link a stylesheet to it).

<div class="img-circular"></div>

Let's set up a basic style for the class img-circular.

.img-circular{
 width: 200px;
 height: 200px;
 background-image: url('http://strawberry-fest.org/wp-content/uploads/2012/01/Coca-Cola-logo.jpg');
 background-size: cover;
 display: block;
}

The only thing, that you might not be familiar with, is the line 5. The background-size is a new CSS3 property, which enables to manipulate with the dimensions of the background. You can set it's width and height by entering exact pixel values, percentage, or make the background cover or make it fit whole container. Make sure you see the background-size documentation for more info.

Making things rounded


So now we have image, that fits our square container. Let's alter the CSS code to make circular frame. We will use border-radius property, which gives us opportunity to round the corners of element it's applied to. To make our image circular we have to use values, which are half of the image size values. Our CSS file now looks like this:

.img-circular{
 width: 200px;
 height: 200px;
 background-image: url('http://strawberry-fest.org/wp-content/uploads/2012/01/Coca-Cola-logo.jpg');
 background-size: cover;
 display: block;
 border-radius: 100px;
 -webkit-border-radius: 100px;
 -moz-border-radius: 100px;
}

And you're done! New CSS properties allow us to create effects which can save you precious minutes of Photoshopping.

Further extensions


If you carefully studied links to documentation I gave you (in case you missed it - check it out), you are perfectly aware, that you can manipulate the image's corners in non-symmetrical way. Try CSS code below. What happened?

.img-circular{
 width: 200px;
 height: 200px;
 background-image: url('http://strawberry-fest.org/wp-content/uploads/2012/01/Coca-Cola-logo.jpg');
 background-size: cover;
 display: block;
 border-top-left-radius: 100px;
 -webkit-border-top-left-radius: 100px;
 -moz-border-top-left-radius: 100px;
 border-bottom-right-radius: 100px;
 -webkit-border-bottom-right-radius: 100px;
 -moz-border-bottom-right-radius: 100px;
}

To see the effects of this tutorial visit this jsFiddle page.
Read More

Saturday, February 1, 2014

How to Auto Post on Facebook with PHP


Share a Link to Facebook using PHP

Here is the code you need to share a link to Facebook using PHP. With small changes you can use this code to post just a message (without link), or to upload a photo in a Facebook album.

Also, with small changes you can use this code to post either to your Facebook Profile or your Fan Pages or Business Pages.

Detailed instructions are provided below in this post.

The following PHP script can be invoked from command line (or Cron) or from your browser.

<?php
// require Facebook PHP SDK
// see: https://developers.facebook.com/docs/php/gettingstarted/
require_once("/YOUR_PATH_TO/facebook_php_sdk/facebook.php");

// initialize Facebook class using your own Facebook App credentials
// see: https://developers.facebook.com/docs/php/gettingstarted/#install
$config = array();
$config['appId'] = 'YOUR_APP_ID';
$config['secret'] = 'YOUR_APP_SECRET';
$config['fileUpload'] = false; // optional

$fb = new Facebook($config);

// define your POST parameters (replace with your own values)
$params = array(
 "access_token" => "YOUR_ACCESS_TOKEN", // see: https://developers.facebook.com/docs/facebook-login/access-tokens/
 "message" => "Here is a blog post about auto posting on Facebook using PHP #php #facebook",
 "link" => "http://www.pontikis.net/blog/auto_post_on_facebook_with_php",
 "picture" => "http://i.imgur.com/lHkOsiH.png",
 "name" => "How to Auto Post on Facebook with PHP",
 "caption" => "www.pontikis.net",
 "description" => "Automatically post on Facebook with PHP using Facebook PHP SDK. How to create a Facebook app. Obtain and extend Facebook access tokens. Cron automation."
);

// post to Facebook
// see: https://developers.facebook.com/docs/reference/php/facebook-api/
try {
 $ret = $fb->api('/YOUR_FACEBOOK_ID/feed', 'POST', $params);
 echo 'Successfully posted to Facebook';
} catch(Exception $e) {
 echo $e->getMessage();
}
?>

From the above code, it is obvious that
  • you have to use Facebook PHP SDK (line 4)
  • you have to create a Facebook app in order to use Facebook API (line 9,10)
  • you have to get an Access Token, so your app can be post on your behalf (line 17)
  • you have to renew Access Token after expiration (about 60 days)
  • you have to get your Facebook id, either for your Personal Profile or for your Fan Pages or Business Pages (line 29)
All these steps are described below. I use a demo app (Demo_auto_post_php) without hiding "sensitive" information like app secret, access tokens etc. The reason is to make the whole process more understandable. Of course, all these "sensitive" data is not valid. This app (Demo_auto_post_php) created just for demo purposes and it has been deleted.

Get Facebook PHP SDK

Download Facebook PHP SDK (v.3.2.2 at the time of writing this article) from Github at You may use any library available (in PHP section) of https://github.com/facebook/facebook-php-sdk.

Actually, you need three files (under folder src)
  • facebook.php (the main class)
  • base_facebook.php (other classes)
  • fb_ca_chain_bundle.crt (SSLcertificate)
Get and put them in the same directory (for example facebook_php_sdk ).

Facebook PHP SDK (v.3.2.2) Requirements

How to Create a Facebook app

Step 1 - Go to https://developers.facebook.com/apps
and sign in with your account. Then press the button "+Create new app".
New app name is Demo_auto_post
(click
the
thumb for full image)
Step 2 - Your new Facebook app is just created

Your Facebook app credentials are now available: App ID and App Secret.
(click
the
thumb for full image)


Step 3 - Disable Sandbox mode and set Canvas URL. Then press "Save changes"

Disable Sandbox mode, so your app will become live (visible to all users).

Click on "App on Facebook" tab and set Canvas URL. I set Canvas URL to "http://localhost/fb-tokens" (and Secure Canvas URL to "https://localhost/fb-tokens"). This is the (local) URL where Facebook will use to redirect some results you need. Of course, you can use any URL you prefer. Please, see below (How to Get Facebook Access Token STEP 1 - create the redirect_uri page) for details.

(click
the
thumb for full image)

Please, note, that, you need a Personal Facebook account in order to create a Facebook app. Then, you can obtain Access Tokens for your Fan or Business Pages. In case you have only a Business Page (without a Personal Facebook profile), you cannot automate post procedure using a Facebook app. In this case you have to create a Personal Profile and then assign you as Admin to Business Page.

How to Get Facebook Access Token

STEP 1 - create the redirect_uri page

First, create a simple php script in your local web server, which has the Canvas URL (redirect_uri) you set creating your Facebook App in STEP 3. I set this URL to http://localhost/fb-tokens/. My local web server DocumentRoot is /srv/http, so:

mkdir /srv/http/fb-tokens
nano /srv/http/fb-tokens/index.php

Put the following code.

<?php
print_r($_GET);
?>

This code will just print the php $_GET array, in other words what Facebook will
pass to you from query string.

STEP 2 - authorize your app (give permissions)

On your browser, give the following url, where client_id is App ID and redirect_uri is the URL defined as Canvas URL

https://www.facebook.com/dialog/oauth?client_id=167252680143474&redirect_uri=http://localhost/fb-tokens/&scope=manage_pages,publish_stream

The part &scope=manage_pages,publish_stream of this URL defines thw permissions you will assign to your app.

Read about Facebook permissions:
  • an introduction here.
  • about Facebook publish_stream permission here.
  • about Facebook manage_pages permission here.
The result will be authorize your app to access your profile
(click
the
thumb for full image)

click OK authorize your app to post to your friends on your behalf
(click
the
thumb for full image)
click OK authorize your app to manage your Pages
(click
the
thumb for full image)
Get the code value


(click
the
thumb for full image)

You will get somenthing like this

Array
(
[code] =>
AQCnhrD8RSxJRmGJdYCfFD33hGPv84xa-xqXKD1-3i3qmsPjqHODEn1cROQkYv6LSKhKlPBxkPHD9gUs-9W0GSwDJVvarX70QiLAYmcLsGhN2u0Ib1OF512TvMljg8WLjx0FaAFCB1DHiTqYE-6ZNtWqtZpe4aIecOw949QNcWbZOf2BiCH_yECCNfamKdatV5Nv1Oa1IvIi_8_zVGc_cQqujVC_O2Apkzyj7M1cypoucGc02NzpAQv3yPqCnIuz5TWglcvhr2YNL7HAClLW0ydWgmq7FyfXOfrbFLoRjd-GRTevmTCffA2iV_A1i-itStY
)

After getting the code value, give the following url, where client_id is App ID and redirect_uri is the URL defined as Canvas URL, client_secret is App Secret and code is the code got.

https://graph.facebook.com/oauth/access_token?client_id=167252680143474&redirect_uri=http://localhost/fb-tokens/&client_secret=29d8d368420dc1e81198fce224ac71c9&code=AQCnhrD8RSxJRmGJdYCfFD33hGPv84xa-xqXKD1-3i3qmsPjqHODEn1cROQkYv6LSKhKlPBxkPHD9gUs-9W0GSwDJVvarX70QiLAYmcLsGhN2u0Ib1OF512TvMljg8WLjx0FaAFCB1DHiTqYE-6ZNtWqtZpe4aIecOw949QNcWbZOf2BiCH_yECCNfamKdatV5Nv1Oa1IvIi_8_zVGc_cQqujVC_O2Apkzyj7M1cypoucGc02NzpAQv3yPqCnIuz5TWglcvhr2YNL7HAClLW0ydWgmq7FyfXOfrbFLoRjd-GRTevmTCffA2iV_A1i-itStY


(click
the
thumb for full image)

You will get the Access Token (!)

access_token=CAACYHYyWcnIBAJ1LwRLTERQNXJ4qRCqoTf2pgs1V2AiZCOreWAH0bY2UKaoyD3elfcEZAZAs6fZAEYPAZC5OlU6ZCg8Org32D13LiencxZA0PsNzkQPPuZCiZAukgMnqLXM0F2ZBlYZAnZB08qVwOo6DgiCJSlkoZCb9VVs0ARsleZBcduzTQKZBvIcvjLZBXXr5ye8R4FcZD&expires=5183831

STEP 3 - Access Tokens for your Facebook Pages (if any)

If you have any Facebook Pages (except your Personal Profile), you can get Access Tokens for them, using the following URL, where access_token is the Access Token you just got for your Personal
Profile

https://graph.facebook.com/me/accounts?access_token=CAACYHYyWcnIBAJ1LwRLTERQNXJ4qRCqoTf2pgs1V2AiZCOreWAH0bY2UKaoyD3elfcEZAZAs6fZAEYPAZC5OlU6ZCg8Org32D13LiencxZA0PsNzkQPPuZCiZAukgMnqLXM0F2ZBlYZAnZB08qVwOo6DgiCJSlkoZCb9VVs0ARsleZBcduzTQKZBvIcvjLZBXXr5ye8R4FcZD

The result will be the following JSON string

{
   "data": [
      {
         "category": "Website",
         "name": "pontikis.net",
         "access_token": "CAACYHYyWcnIBAMK1y2tqiRKx8bBXGFFzjdUamOlMZCBJrTSL8ic1z5sZBarBi3DbTh9mMUz3aiZCAQRNHvOmcMxLZC53FNtkrVCq8rZCLsyjbQVZAt8o7S6Rd1UT0LK7AkgyZAlu11MC9rWND8eZBiKjjiYjwmBMLWko7k6GGPZCREehKRNFCsyM1Ll7sFb1hXycZD",
         "perms": [
            "ADMINISTER",
            "EDIT_PROFILE",
            "CREATE_CONTENT",
            "MODERATE_CONTENT",
            "CREATE_ADS",
            "BASIC_ADMIN"
         ],
         "id": "466400200079875"
      }
   ],
   "paging": {
      "next": "https://graph.facebook.com/100005247665389/accounts?access_token=CAACYHYyWcnIBAJ1LwRLTERQNXJ4qRCqoTf2pgs1V2AiZCOreWAH0bY2UKaoyD3elfcEZAZAs6fZAEYPAZC5OlU6ZCg8Org32D13LiencxZA0PsNzkQPPuZCiZAukgMnqLXM0F2ZBlYZAnZB08qVwOo6DgiCJSlkoZCb9VVs0ARsleZBcduzTQKZBvIcvjLZBXXr5ye8R4FcZD&limit=5000&offset=5000&__after_id=491387474252073"
   }
}

Except of getting Access Token for your Fan Pages, the above step is useful to get your Fan Pages Facebook id. You will need it, when you try to post to your Fan Pages. However, this procedure is described independently (see below: How to Find your Facebook id)

STEP 4 - Check your Access Token

Facebook Access Tokens will expire in about an hour. Access Token obtained with the above procedure are long-lived Access Tokens and will expire after two months (60 days).

offline_access permission, used to prevent tokens expiration, was depreceted since 2012. Read more at https://developers.facebook.com/roadmap/offline-access-removal/.

Since offline access is deprecated you cannot create an access token which doesn’t expire. The best you can get is a long-lived Access Token (expires in 60 days).

So, it is very important to know your Access Token expiration time. Just use the URL

https://developers.facebook.com/tools/debug/access_token

For example, to check (debug) the Access Token obtained for this demo

(click
the
thumb for full image)
Notice that this Access Token will expire after 60 days.

I remind you that this app (Demo_auto_post_php) has been deleted, so the above URL will not give you the same results. The above screenshot is taken before app deletion.

Renew Access Token after expiration

Facebook long-lived Access Tokens will expire after about two months (60
days). In order your app to remain functioning, you (unfortunately) have to
repeat "How to Get Facebook Access Token - STEP 2".

How to Find your Facebook id

The Facebook id of a Personal Profile of Fan Page or Business Page is public information, available using Facebook Graph API. Just use a URL like:

http://graph.facebook.com/username

For example:

To find my Facebook Personal Profile id, use:

http://graph.facebook.com/chr.pontikis

To find Facebook id of my Fan Page (the Fan Page of this blog), use:

http://graph.facebook.com/pontikis.net

You may also use some online tools like http://findfacebookid.com/

DEMO

Here are some demo posts.

Share a Link to Personal Profile

The code is

<?php
require_once("/path/to/facebook_php_sdk/facebook.php"); // set the right path

$config = array();
$config['appId'] = '167252680143474';
$config['secret'] = '29d8d368420dc1e81198fce224ac71c9';
$config['fileUpload'] = false; // optional
$fb = new Facebook($config);

$params = array(
 // this is the main access token (facebook profile)
 "access_token" => "CAACYHYyWcnIBAJ1LwRLTERQNXJ4qRCqoTf2pgs1V2AiZCOreWAH0bY2UKaoyD3elfcEZAZAs6fZAEYPAZC5OlU6ZCg8Org32D13LiencxZA0PsNzkQPPuZCiZAukgMnqLXM0F2ZBlYZAnZB08qVwOo6DgiCJSlkoZCb9VVs0ARsleZBcduzTQKZBvIcvjLZBXXr5ye8R4FcZD",
 "message" => "Here is a blog post about auto posting on Facebook using PHP #php #facebook",
 "link" => "http://www.pontikis.net/blog/auto_post_on_facebook_with_php",
 "picture" => "http://i.imgur.com/lHkOsiH.png",
 "name" => "How to Auto Post on Facebook with PHP",
 "caption" => "www.pontikis.net",
 "description" => "Automatically post on Facebook with PHP using Facebook PHP SDK. How to create a Facebook app. Obtain and extend Facebook access tokens. Cron automation."
);

try {
 $ret = $fb->api('/me/feed', 'POST', $params);
 echo 'Successfully posted to Facebook Personal Profile';
} catch(Exception $e) {
 echo $e->getMessage();
}
?>

And the result is
Share a Link to Fan Page
The code is

<?php
require_once("/path/to/facebook_php_sdk/facebook.php"); // set the right path

$config = array();
$config['appId'] = '167252680143474';
$config['secret'] = '29d8d368420dc1e81198fce224ac71c9';
$config['fileUpload'] = false; // optional
$fb = new Facebook($config);

$params = array(
 // this is the access token for Fan Page
 "access_token" => "CAACYHYyWcnIBAMK1y2tqiRKx8bBXGFFzjdUamOlMZCBJrTSL8ic1z5sZBarBi3DbTh9mMUz3aiZCAQRNHvOmcMxLZC53FNtkrVCq8rZCLsyjbQVZAt8o7S6Rd1UT0LK7AkgyZAlu11MC9rWND8eZBiKjjiYjwmBMLWko7k6GGPZCREehKRNFCsyM1Ll7sFb1hXycZD",
 "message" => "Here is a blog post about auto posting on Facebook using PHP #php #facebook",
 "link" => "http://www.pontikis.net/blog/auto_post_on_facebook_with_php",
 "picture" => "http://i.imgur.com/lHkOsiH.png",
 "name" => "How to Auto Post on Facebook with PHP",
 "caption" => "www.pontikis.net",
 "description" => "Automatically post on Facebook with PHP using Facebook PHP SDK. How to create a Facebook app. Obtain and extend Facebook access tokens. Cron automation."
);

try {
 // 466400200079875 is Facebook id of Fan page https://www.facebook.com/pontikis.net
 $ret = $fb->api('/466400200079875/feed', 'POST', $params);
 echo 'Successfully posted to Facebook Fan Page';
} catch(Exception $e) {
 echo $e->getMessage();
}
?>

And the result is


Upload a photo to Facebook Album

The code is

<?php
require_once("/path/to/facebook_php_sdk/facebook.php"); // set the right path

$config = array();
$config['appId'] = '167252680143474';
$config['secret'] = '29d8d368420dc1e81198fce224ac71c9';
$config['fileUpload'] = true;
$fb = new Facebook($config);

$params = array(
 // this is the access token for Fan Page
 "access_token" => "CAACYHYyWcnIBAMK1y2tqiRKx8bBXGFFzjdUamOlMZCBJrTSL8ic1z5sZBarBi3DbTh9mMUz3aiZCAQRNHvOmcMxLZC53FNtkrVCq8rZCLsyjbQVZAt8o7S6Rd1UT0LK7AkgyZAlu11MC9rWND8eZBiKjjiYjwmBMLWko7k6GGPZCREehKRNFCsyM1Ll7sFb1hXycZD",
 "message" => "Here is a blog post about auto posting on Facebook using PHP #php #facebook",
 "source" => "@" . "/home/pontikis/photo.png", // ATTENTION give the PATH not URL
);

try {
 // 466400200079875 is Facebook id of Fan page https://www.facebook.com/pontikis.net
 $ret = $fb->api('/466400200079875/photos', 'POST', $params);
 echo 'Photo successfully uploaded to Facebook Album';
} catch(Exception $e) {
 echo $e->getMessage();
}
?>

The result in the timeline is
and the photo is available in the album
Putting them all together

Of course, you may use these code samples with many ways. For example to post a topic on Facebook just after it is published. Below is how I use this code to post on Facebook every day, using Cron. (I am not referring to this blog. I share pontikis.net posts manually, as the new topics are two or three per week. I use automation for other sites I manage with more than five new
topics every day).

The following PHP script can be invoked from command line (or Cron) or from your browser.

Remember to put this script in a protected directory of your web server (without public access).

Here is a short description of the script.
  • I use MySQL in this example, but, of course, any database could be used. In my database, the "topics" table has some columns to support post automation to Facebook, as:

    • facebook_post varchar(400) - the text to be posted
    • facebook_image varchar(400) - the URL of the link image (if any)
    • facebook_pubstatus int - "0" means that this topic is pending to be posted, "1" means topic has been posted to facebook

  • First, an array is created ($share_topics), which contains the topics to be posted to Facebook. Obviously, you have to customize the SQL query, according to your database structure.
  • Each array element is posted to Facebook. If no error occured, this topic facebook_pubstatus is set to 1 (so, it will not be posted once more, in case script will run again)
  • The script produces a meaningful report and keeps logs.

    Take care for logfile rotation, for example:

    nano /etc/logrotate.d/auto_share  

    Add the following replace /path/to/... with your path)

    /path/to/auto_share.log {
       weekly
       missingok
       rotate 4
       notifempty
       create
      }
      
Here is the code:

<?php
// determine script invocation (CLI or Web Server)
if(php_sapi_name() == 'cli') {
 $line_break = PHP_EOL;
} else {
 $line_break = '<br>';
}

// require Facebook PHP SDK
require_once("/path/to/facebook_php_sdk/facebook.php"); // configure /path/to/... appropriately

// initialize Facebook class using your own Facebook App credentials
$config = array();
$config['appId'] = 'YOUR_APP_ID';  // configure appropriately
$config['secret'] = 'YOUR_APP_SECRET'; // configure appropriately
$config['fileUpload'] = false; // optional

$fb = new Facebook($config);

// get current time - configure appropriately, depending to how you store dates in your database
$now =  date("YmdHis");

// connect to database
$conn = new mysqli("db_server", "db_user", "db_passwd", "db_name"); // configure appropriately

// check connection
if ($conn->connect_error) {
 trigger_error('Database connection failed: '  . $conn->connect_error, E_USER_ERROR);
}

// create array with topics to be posted on Facebook
$sql = 'SELECT id as topic_id, title, url, description, facebook_post, facebook_image, facebook_pubstatus FROM topics ' .
 'WHERE date_published IS NOT NULL AND date_published <= ' . "'" . $now . "' " .
 'AND facebook_pubstatus = 0 ' .
 'ORDER BY date_published ASC';

$rs = $conn->query($sql);
if($rs === false) {
 $user_error = 'Wrong SQL: ' . $sql . '<br>' . 'Error: ' . $conn->errno . ' ' . $conn->error;
 trigger_error($user_error, E_USER_ERROR);
}
$rs->data_seek(0);
while($res = $rs->fetch_assoc()) {
 $a_topic = array(
  "topic_id" => $res["topic_id"],
  "topic_title" => $res["title"],
  "topic_url" => $res["url"],
  "topic_description" => $res["description"],
  "facebook_post" => $res["facebook_post"],
  "facebook_image" => $res["facebook_image"],
  "facebook_pubstatus" => $res["facebook_pubstatus"]
 );
 array_push($share_topics, $a_topic);
}
$rs->free();

// AUTOMATIC POST EACH TOPIC TO FACEBOOK
foreach($share_topics as $share_topic) {

 if($share_topic['facebook_status'] == 0) {

  // define POST parameters
  $params = array(
   "access_token" => "YOUR_ACCESS_TOKEN", // configure appropriately
   "message" => $share_topic['facebook_post'],
   "link" => $share_topic['topic_url'],
   "name" => $share_topic['topic_title'],
   "caption" => "YOUR_SITE_URL", // configure appropriately
   "description" => $share_topic['topic_description']
  );

  if($share_topic['facebook_image']) {
   $params["picture"] = $share_topic['facebook_image'];
  }

  // check if topic successfully posted to Facebook
  try {
   $ret = $fb->api('/YOUR_FACEBOOK_ID/feed', 'POST', $params); // configure appropriately

   // mark topic as posted (ensure that it will be posted only once)
   $sql = 'UPDATE topics SET facebook_pubstatus = 1 WHERE id = ' . $share_topic['topic_id'];
   if($conn->query($sql) === false) {
    trigger_error('Wrong SQL: ' . $sql . ' Error: ' . $conn->error, E_USER_ERROR);
   }
   $result .= $share_topic['topic_id'] . ' ' . $share_topic['facebook_post'] . ' successfully posted to Facebook!' . $line_break;

  } catch(Exception $e) {
   $result .= $share_topic['topic_id'] . ' ' . $share_topic['facebook_post'] . ' FAILED... (' . $e->getMessage() . ')' . $line_break;
  }

  sleep(3);
 }

}

if(php_sapi_name() == 'cli') {
 // keep log
 file_put_contents('/path/to/auto_share.log', $result . str_repeat('=', 80) . PHP_EOL, FILE_APPEND);

 echo $result;

} else {
 $html = '<html><head>';
 $html .= '<meta http-equiv="Content-Type" content="text/html; charset=UTF-8">';
 $html .= '</head>';
 $html .= '<body>';
 $html .= $result;
 $html .= '</body>';
 $html .= '</html>';
 echo $html;
}
?>

Cron automation

Here is an example to run every day on 07:30 (your server time) the auto
share php script, using Cron. A mail will be sent with the results.

As root

crontab -e

add the following line

30 7 * * * /usr/bin/php /path/to/auto_share.php | mail -s "Auto share results" you@your-email.com
Read More

Sunday, January 26, 2014

How To Add New Widget Sections In Blogger On Different Places?

This is a detailed post in which i will try to teach you how to add extra columns to your blogger template. It is very easy but for this you must know a little about HTML. Follow my steps and try and please give your feedback. If required any further information, feel free to ask.

widget section

Step #1 

First of all go to the HTML editor of your blogger template. Do not click "Expand Widgets"

Search for :
 <body>
Now the actual works starts from here.

Adding New Widget Section In The Header Area

before adding the blogger section
Now search for 
<div id='headerbg'>
 in some cases you might search for this
<div id='header-wrapper'>
Here is the code for the new Widget Section
<b:if cond='data:blog.url == data:blog.homepageUrl'><b:section class='sidebar' id='magazine-left' showaddelement='yes' > <b:widget id='Text51' locked='false' title='Test Title 1' type='Text'/> </b:section> </b:if>
You have to change the Orange text if you want to use this code again and again in your template. You can write anything. This widget will be shown only in home page. If you want it on every page, than use this code
<b:section class='sidebar' id='magazine-left' showaddelement='yes' > <b:widget id='Text51' locked='false' title='Test Title 1' type='Text'/> </b:section>
Now here is where to add the above code


OR 


Now here is the Change


The easy way to find where to add the widget is that search for the existing widget. For example, i gave a title " Delete this element" to a widget. Now if i want to put a new widget section above it, than simply search for " Delete this element " and paste the code above it.


How to Add new widget Section above the blog Posts :

Search for
<b:widget id='Blog1' locked='true' title='Blog Posts' type='Blog'/>
Remember you cannot add a section in between the previous section. Just like this


Now if you want new widgets above the Blog Posts, than add the code above the code shown in the picture. If you want below the post, than simply add the code below.

Note: Your code might be some different, so you have to look yourself. Only thing to remember is that you have to put your new code before <b:section or after </b:section> not in between.

How To Add A New Widget In The Sidebar

To add new widget section in the sidebar, simply do the easy work as i mentioned above. Search for the existing widget and choose where to add, BELOW or ABOVE. Just like this.


In my case, i will search for " Follow me "


Now add the code above or below the entire section.

Just like this, you can add new widgets on any place in your template. Simply add a new widget, give a title to it and than search for that title in HTML editor and place the new code Above or Below. Its Simple. But remember, add the code before the opening section or after the closing section.

If you want to add Two columns at a time just like the one below


Than simply follow these steps. The steps are same just one step will be added.
Use this code instead of the one above
<b:if cond='data:blog.url == data:blog.homepageUrl'>
<b:section class='sidebar' id='magazine-left' showaddelement='yes' >
<b:widget id='Text51' locked='false' title='Test Title 1' type='Text'/>
</b:section>
<b:section class='sidebar' id='magazine-right' showaddelement='yes' >
<b:widget id='Text52' locked='false' title='Test Title 2' type='Text'/>
</b:section>
<div style="clear: both;"></div>
</b:if>
If you want to show this widget section on every page than use this
<b:section class='sidebar' id='magazine-left' showaddelement='yes' >
<b:widget id='Text51' locked='false' title='Test Title 1' type='Text'/>
</b:section>
<b:section class='sidebar' id='magazine-right' showaddelement='yes' >
<b:widget id='Text52' locked='false' title='Test Title 2' type='Text'/>
</b:section>
<div style="clear: both;"></div>
Search for </b:skin> and add this code above it
#magazine-left {
width: 45%;
float: left;
}
#magazine-right {
width: 45%;
float: right;
}
Note: If you want to use this code again and again than simply just change the text in Orange. The Orange text in first and second part of code should be similar.

If have any questions, than ask.Would love to help.smile
Read More

About Us

I, Bimal K. Chawla, Working in Android technology as Associate Software Engineer in Mohali, Punjab, India. I likes to play and watch cricket, to Walk...Read More

Blogroll

Advertisment

About